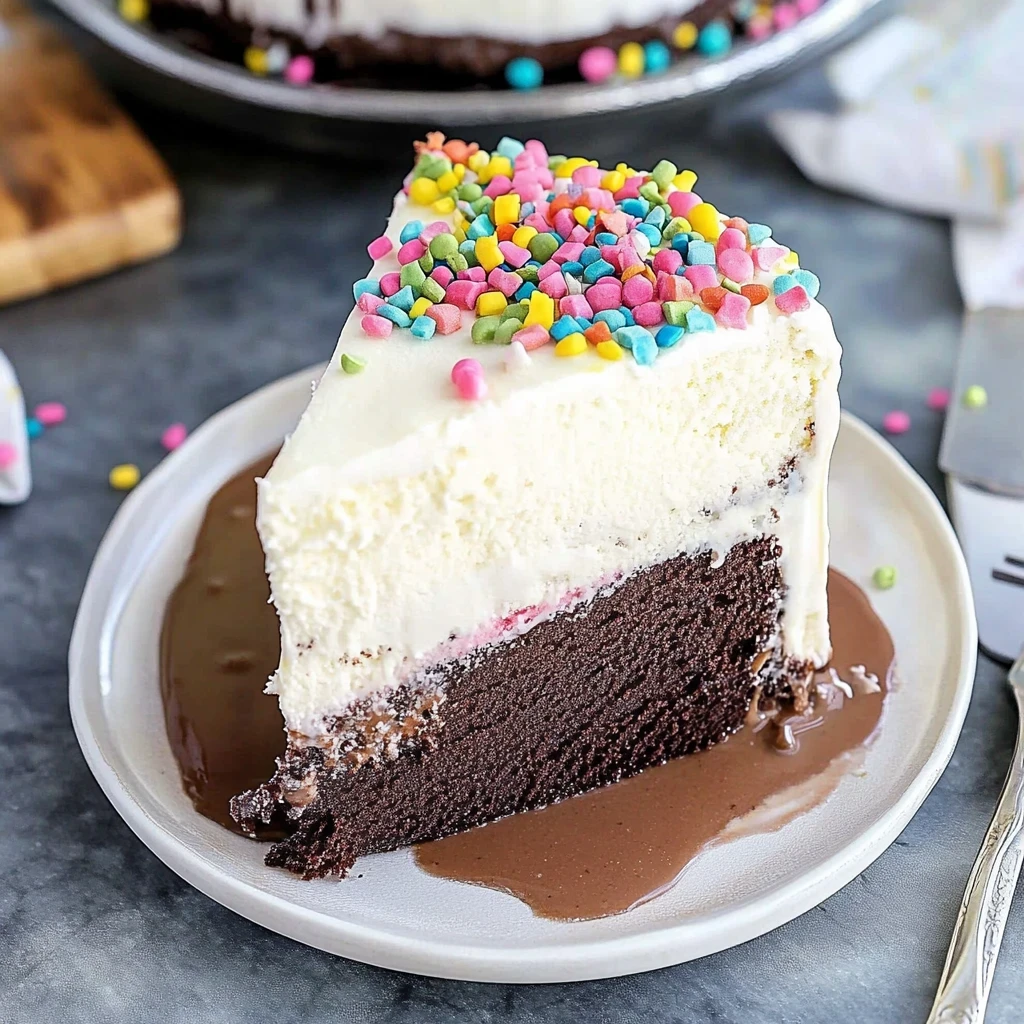
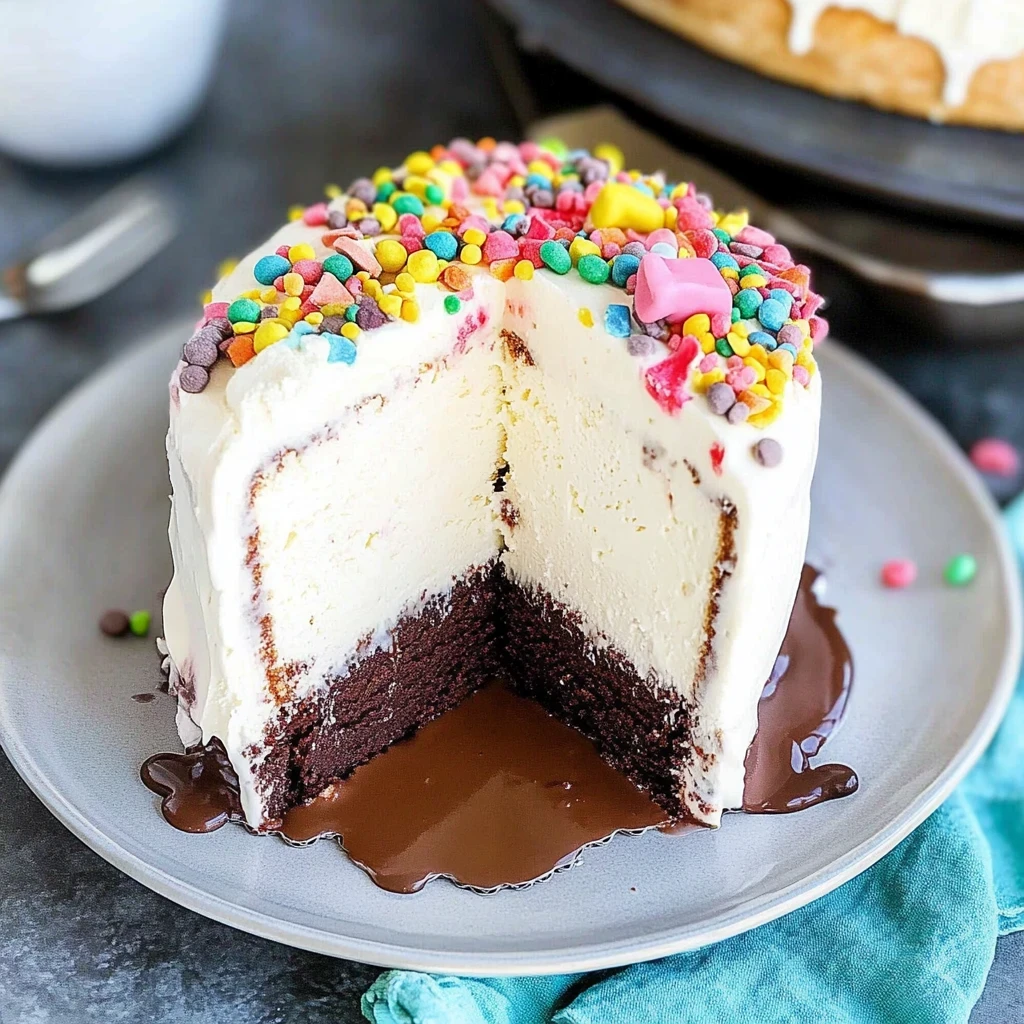
Imagine slicing into a velvety dairy queen ice cream cake, where layers of creamy vanilla and rich chocolate ice cream dance together like long-lost friends at a reunion. Each bite reveals a delightful crunch from chocolate cookie crumbs, creating a texture that is both smooth and satisfying, while the luscious drizzle of chocolate syrup adds just the right amount of indulgence to this frozen masterpiece.
Growing up, my family treated ice cream cakes as the crowning glory of every birthday celebration. The anticipation would build as my siblings and I gathered around the table, eyes wide with excitement and spoons at the ready. This dairy queen ice cream cake is not just a dessert; it’s a sweet trip down memory lane that transforms any occasion into a festive affair filled with joy and laughter. Trust me, each slice promises an explosion of flavors that will have everyone begging for seconds!
Why You'll Love This Recipe
- This delightful dairy queen ice cream cake is a no-bake treat that anyone can whip up in no time
- The rich mix of vanilla and chocolate ice cream creates a dreamy flavor explosion that’ll have your taste buds dancing
- With its decadent layers and eye-catching drizzle, it’s the showstopper of any dessert table
- Whether it’s a birthday bash or just because, this cake easily adapts to any occasion you throw at it
Last summer, my kids’ eyes lit up with joy when they saw the dairy queen ice cream cake I made for their birthday.
Essential Ingredients
Here’s what you’ll need to make this delicious dairy queen ice cream cake:
Vanilla Ice Cream: Choose a high-quality vanilla ice cream for a creamy and smooth base layer.
Chocolate Ice Cream: Select a rich chocolate ice cream that complements the vanilla flavor perfectly.
Chocolate Cookie Crumbs: Use finely crushed chocolate cookies to create a crunchy texture between the layers.
For the Topping:
Whipped Topping: Opt for a light whipped topping for easy spreading and a fluffy finish on your cake.
Chocolate Syrup: A good quality chocolate syrup enhances the visual appeal and taste of your cake with sweet drizzles.
The full ingredients list, including measurements, is provided in the recipe card directly below.
Let’s Make it together
Prepare the Cake: Begin by taking your quart of softened vanilla ice cream and gracefully spreading half of it into the bottom of a prepared cake pan. Use a spatula to smooth it out evenly, creating a lovely white canvas that will soon become a delicious treat. The creamy texture should feel silky under your spatula as you work to make sure it’s evenly distributed. Next, sprinkle one cup of chocolate cookie crumbs over this vanilla layer, allowing their rich, chocolaty aroma to fill the air. This step adds not only flavor but also a delightful crunch to each slice. Now, take your quart of softened chocolate ice cream and spread it over the cookie crumbs, smoothing it out until it’s level with the edges of the pan. The deep brown color is enticing and signals the decadence that awaits. Afterward, top with the remaining vanilla ice cream and smooth it out just like you did before, ensuring every inch is covered. Finally, cover the entire cake with plastic wrap and place it in the freezer for at least four hours or until firm—this time allows all those beautiful flavors to meld together.
Frost and Serve: Once your cake has set firmly in the freezer, it’s time for some fun! Remove the cake from the freezer and gently take it out of the pan, which can be done by running a warm knife around the edges—this little trick helps release your masterpiece without any hassle. Now comes the exciting part: grab your whipped topping and spread it evenly over both the top and sides of your cake. This fluffy layer will provide a beautiful contrast against the rich ice creams beneath. As you do this, let your creativity shine; you can create swirls or simple smooth finishes depending on your mood. After frosting, drizzle chocolate syrup generously over the top—watch as it cascades down in delightful ribbons that make everyone’s mouth water. You can slice and serve immediately for an instant treat or return it to the freezer if you’re not quite ready yet. Enjoy every creamy bite of this delightful homemade dairy queen ice cream cake!
Chef's Helpful Tips
- When softening the ice cream, let it sit at room temperature for about 15 minutes for easy spreading
- Use a flat spatula to smooth out each layer evenly and create a professional-looking cake
- For the best flavor, consider using high-quality chocolate syrup and whipped topping to enhance your dairy queen ice cream cake
Perfecting the Cooking Process
To achieve the best results with your dairy queen ice cream cake, start by preparing the cake layers in a well-organized manner. Spread the vanilla ice cream first and layer with chocolate cookie crumbs. Then, follow with chocolate ice cream and finish with the remaining vanilla. Freeze for at least four hours to ensure firmness.
Why You’ll Love This Dairy Queen Ice Cream Cake
This delightful dairy queen ice cream cake is a showstopper for any occasion. With its rich layers of vanilla and chocolate ice cream, combined with a crunchy chocolate cookie crust, it delivers an irresistible flavor combination. The whipped topping and chocolate syrup add a finishing touch that makes this cake visually appealing and incredibly satisfying.
Ingredients You’ll Need
To make this delicious dairy queen ice cream cake, gather the following ingredients: 1 quart of softened vanilla ice cream, 1 quart of softened chocolate ice cream, and 2 cups of chocolate cookie crumbs for layering. For the topping, you will need 1 cup of whipped topping and 1 cup of chocolate syrup for drizzling.
Step-by-Step Instructions
Begin by spreading half of the softened vanilla ice cream into the bottom of your cake pan. Ensure it is smooth and even. Next, sprinkle 1 cup of chocolate cookie crumbs over this layer before adding the softened chocolate ice cream on top. Smooth it out nicely, then add the remaining vanilla ice cream layer and smooth it once more. Cover your creation with plastic wrap and freeze for at least four hours or until fully firm.
Frosting and Serving Your Cake
Once your cake has frozen solid, remove it from the freezer and take it out of the pan carefully. Use the whipped topping to frost the top and sides evenly for a beautiful finish. Finally, drizzle chocolate syrup over the top as a decoration before slicing. You can serve immediately or return it to the freezer until you’re ready to enjoy this delightful dessert!
Add Your Touch
Get creative with your dairy queen ice cream cake by swapping the vanilla and chocolate ice cream for your favorite flavors like strawberry or mint chocolate chip. For an extra crunch, consider adding crushed nuts or sprinkles between the layers. You can also top it with caramel sauce instead of chocolate syrup for a delightful twist.
Storing & Reheating
To store your dairy queen ice cream cake, wrap it tightly in plastic wrap or aluminum foil and place it in the freezer for up to one month. Do not attempt to reheat; simply slice and serve directly from the freezer for the best texture and flavor.
FAQ
What ingredients are needed for a dairy queen ice cream cake?
You will need vanilla ice cream, chocolate ice cream, chocolate cookie crumbs, whipped topping, and chocolate syrup.
How long does it take to prepare the dairy queen ice cream cake?
The total time is approximately 240 minutes, including a 4-hour freezing period.
Can I customize the dairy queen ice cream cake recipe?
Yes, you can add different toppings or flavors of ice cream to suit your taste.
dairy queen ice cream cake
Ingredients
Method
- Spread half of the softened vanilla ice cream into the bottom of the cake pan and smooth it out evenly.
- Sprinkle 1 cup of chocolate cookie crumbs over the vanilla layer.
- Spread the softened chocolate ice cream over the cookie crumbs and smooth it out.
- Top with the remaining vanilla ice cream and smooth it out.
- Cover the cake with plastic wrap and freeze for at least 4 hours or until firm.
- Remove the cake from the freezer and take it out of the pan.
- Spread the whipped topping evenly over the top and sides of the cake.
- Drizzle chocolate syrup over the top for decoration.
- Slice and serve immediately or return to the freezer until ready to serve.